How to Diagnose Heating Element Failures in Heated Garments: A DIY Step‑by‑Step Guide
Introduction
One will discover how to locate and resolve heating element failures in a variety of heated garments, including jackets, gloves, and blankets. The guide explains why accurate diagnosis prevents costly replacements and extends the useful life of the garment. It also demonstrates how a systematic approach reduces the risk of electrical shock and preserves the integrity of delicate textile components. By following the steps, one will gain confidence to perform repairs that previously required a professional electrician.
What You'll Need
- Digital multimeter with continuity testing mode
- Screwdriver set with insulated handles
- Heat‑resistant replacement heating element (specific to the garment model)
- Electrical tape and heat‑shrink tubing
- Protective gloves and safety glasses
- Reference guide: Home Electrical Troubleshooting and Repairs
- Reference guide: How to Diagnose and Fix Everything Electronic
- Reference guide: HVAC Training: Diagnosing the Electric Heat
- Reference workbook: Electrical Troubleshooting Workbook
Step 1: Ensure Safety Before Beginning
One must disconnect the garment from any power source and remove any battery packs before handling internal components. Wearing insulated gloves and safety glasses protects against accidental short circuits and sharp textile edges. It is advisable to work on a non‑conductive surface such as a wooden table to minimise the chance of stray currents. The Home Electrical Troubleshooting and Repairs book offers a concise safety checklist that aligns with industry standards; its five‑star rating indicates that readers find the guidance reliable.
Step 2: Perform a Visual Inspection of the Garment
One should examine the exterior for visible signs of wear, such as frayed seams, burnt patches, or discoloration near the heating zones. Open the garment’s internal cavity using the appropriate screwdriver, taking care not to damage the fabric lining. Look for broken wires, loose solder joints, or corrosion on the heating element connectors. The visual clues often point directly to the faulty component, and the How to Diagnose and Fix Everything Electronic guide explains how to interpret these signs in electronic assemblies; its 4.5‑star rating from over two thousand reviewers confirms its practical value.
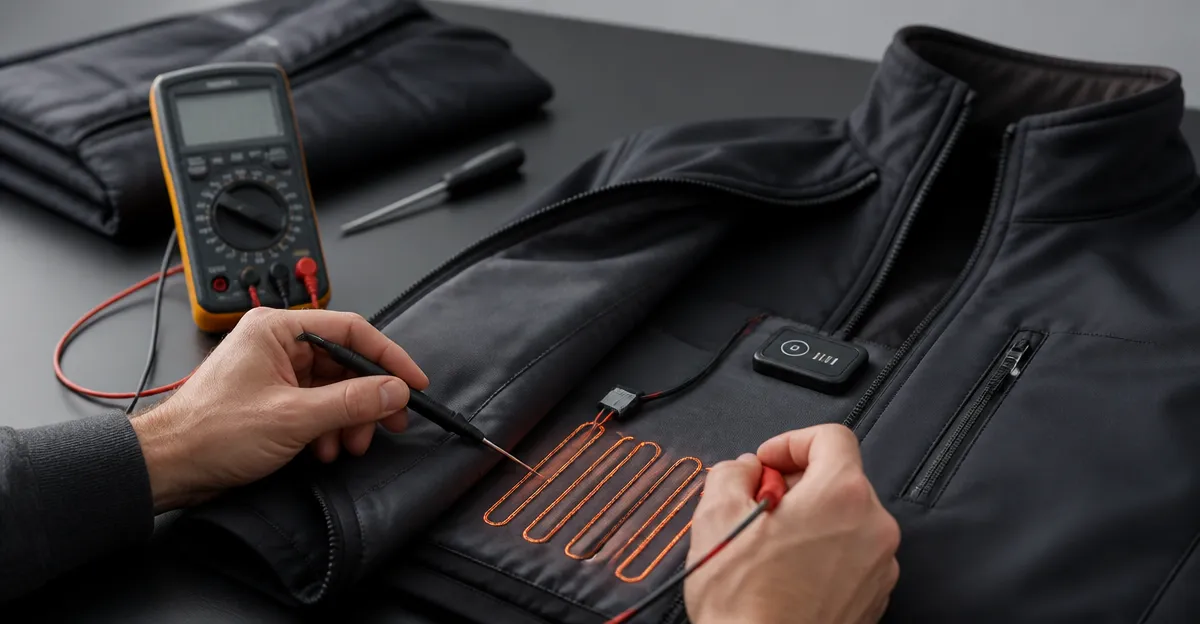
Step 3: Test Continuity of the Heating Element
One must set the digital multimeter to the continuity or resistance mode and place the probes on the element’s leads. A reading of infinite resistance indicates an open circuit, confirming that the element has failed. If the multimeter registers a low but non‑zero resistance, the element may still be functional, and the problem could lie elsewhere in the control circuit. The HVAC Training: Diagnosing the Electric Heat ebook provides a clear explanation of heating element resistance ranges; its perfect rating demonstrates that readers consider the information accurate and easy to apply.
Step 4: Isolate the Faulty Heating Element
One should disconnect the element from the garment’s control board by desoldering the leads or unplugging the connector, depending on the design. Label each wire with a small piece of tape to ensure correct reconnection later. After isolation, repeat the continuity test on the element alone to verify the earlier result. The Electrical Troubleshooting Workbook includes practice exercises for fault isolation, allowing one to reinforce the technique before applying it to the garment; its hands‑on approach is praised by readers.
Step 5: Replace or Repair the Heating Element
If the element is confirmed defective, one should obtain a replacement that matches the original specifications for voltage, wattage, and dimensions. Solder the new leads onto the control board, using heat‑shrink tubing to insulate each joint and prevent future short circuits. In cases where the element is only partially damaged, one may apply conductive epoxy as a temporary repair, but replacement remains the most reliable solution. The Home Electrical Troubleshooting and Repairs guide outlines soldering best practices and recommends specific tools that improve joint quality, reinforcing the value of its five‑star rating.
Step 6: Reassemble the Garment and Verify Functionality
One must carefully route the wires back through the garment’s fabric channels, avoiding sharp bends that could cause fatigue. Secure the seams with the original stitching or a textile adhesive, ensuring that the heating element remains flat against the fabric for even heat distribution. Reinstall the battery pack and activate the garment’s heat settings, observing whether each zone warms as expected. A final continuity check after reassembly confirms that no new faults were introduced during repair.
Tips & Pro Tips
- Always test the multimeter on a known good circuit before use to ensure accurate readings.
- When soldering, use a temperature‑controlled iron set to approximately 350°C to avoid damaging polymer insulation.
- Apply a thin layer of silicone‑based heat‑resistant sealant around the element connectors to protect against moisture ingress.
- Document each step with photographs; this practice simplifies future troubleshooting and aids warranty claims.
Troubleshooting
Problem: The garment powers on but no heat is produced.
Solution: Verify that the control board receives power by measuring voltage at its input terminals. If voltage is present, repeat the continuity test on each heating zone; a single open circuit indicates a failed element that requires replacement.
Problem: Intermittent heating or hot spots.
Solution: Inspect the element for physical cracks or uneven solder joints. Re‑solder any dubious connections and ensure that the element is fully seated against the fabric without trapped air pockets.
Conclusion
One has now learned a systematic approach to diagnose heating element failures in heated garments, from safety preparation to final verification. The guide emphasises the importance of accurate testing, proper isolation, and careful reassembly to achieve reliable results. By applying the recommended reference books, one can deepen understanding of electrical diagnostics and enhance future repair projects. The confidence gained from completing this DIY repair encourages one to maintain additional garments and reduces reliance on costly professional services.
Products Mentioned in This Guide
Frequently Asked Questions
What are the first steps to diagnose a heating element failure in a heated jacket?
Turn off the garment, locate the control module, and use a digital multimeter in continuity mode to test the element’s leads for an open circuit.
Which tools are essential for safely repairing heated garments?
A digital multimeter, insulated screwdrivers, protective gloves, safety glasses, electrical tape, and heat‑shrink tubing are recommended.
How can I tell if a heating element needs to be replaced versus repaired?
If the multimeter shows no continuity or infinite resistance, the element is broken and should be replaced; intermittent resistance may indicate a loose connection that can be re‑soldered.
What safety precautions should I follow when testing heating elements?
Always disconnect the power source, wear insulated gloves and safety glasses, and work on a dry, non‑conductive surface to avoid electric shock.
Can I use any heating element as a replacement for my heated blanket?
No, you must use a heat‑resistant element that matches the specific model and voltage rating of the garment to ensure proper function and safety.