Introduction
Winter cycling presents a unique set of challenges that demand careful preparation and the right equipment. One of the most critical factors for a comfortable ride is maintaining body temperature without sacrificing mobility. This guide will teach the reader how to choose appropriate heated clothing, integrate it into a layering system, and use it effectively on cold rides. By following the steps, one will be able to ride longer, enjoy better performance, and reduce the risk of hypothermia.
The information presented combines scientific principles of thermoregulation with practical experience from seasoned cyclists. It also highlights a specific product that serves as an affordable and reliable base layer for winter conditions. While the guide emphasizes safety and comfort, it does not require the purchase of every recommended item; alternatives are discussed where appropriate. Ultimately, the reader will leave with a clear plan for staying warm on any cold‑weather ride.
What You'll Need
- Heated cycling jersey or thermal base layer (e.g., GCRFL Winter Cycling Jersey Set)
- Battery pack compatible with heated garments
- Water‑proof outer jacket and wind‑proof pants
- Gloves, hat, and shoe covers designed for low temperatures
- Basic repair kit (multi‑tool, spare tube, tire levers)
- Smartphone or GPS device for route planning
Step‑by‑Step Instructions
1. Assess Weather Conditions and Route Profile
Begin by checking the forecast for temperature, wind chill, and precipitation on the intended route. Wind chill can reduce perceived temperature by up to 20 °F, which influences the amount of heating required. Identify sections of the route that are exposed to wind or lack shelter, as these areas will demand more active heating. Record the expected temperature range so that you can match it with the appropriate clothing layers.
Next, consider the duration of the ride and the intensity of effort. Longer rides at moderate intensity generate less body heat than short, high‑intensity efforts, meaning that heated garments may need to run continuously. Conversely, a high‑intensity sprint may produce enough internal heat that the heating element can be turned off to conserve battery life. By aligning weather data with ride characteristics, you create a solid foundation for selecting the correct thermal solution.
2. Choose an Appropriate Heated Base Layer
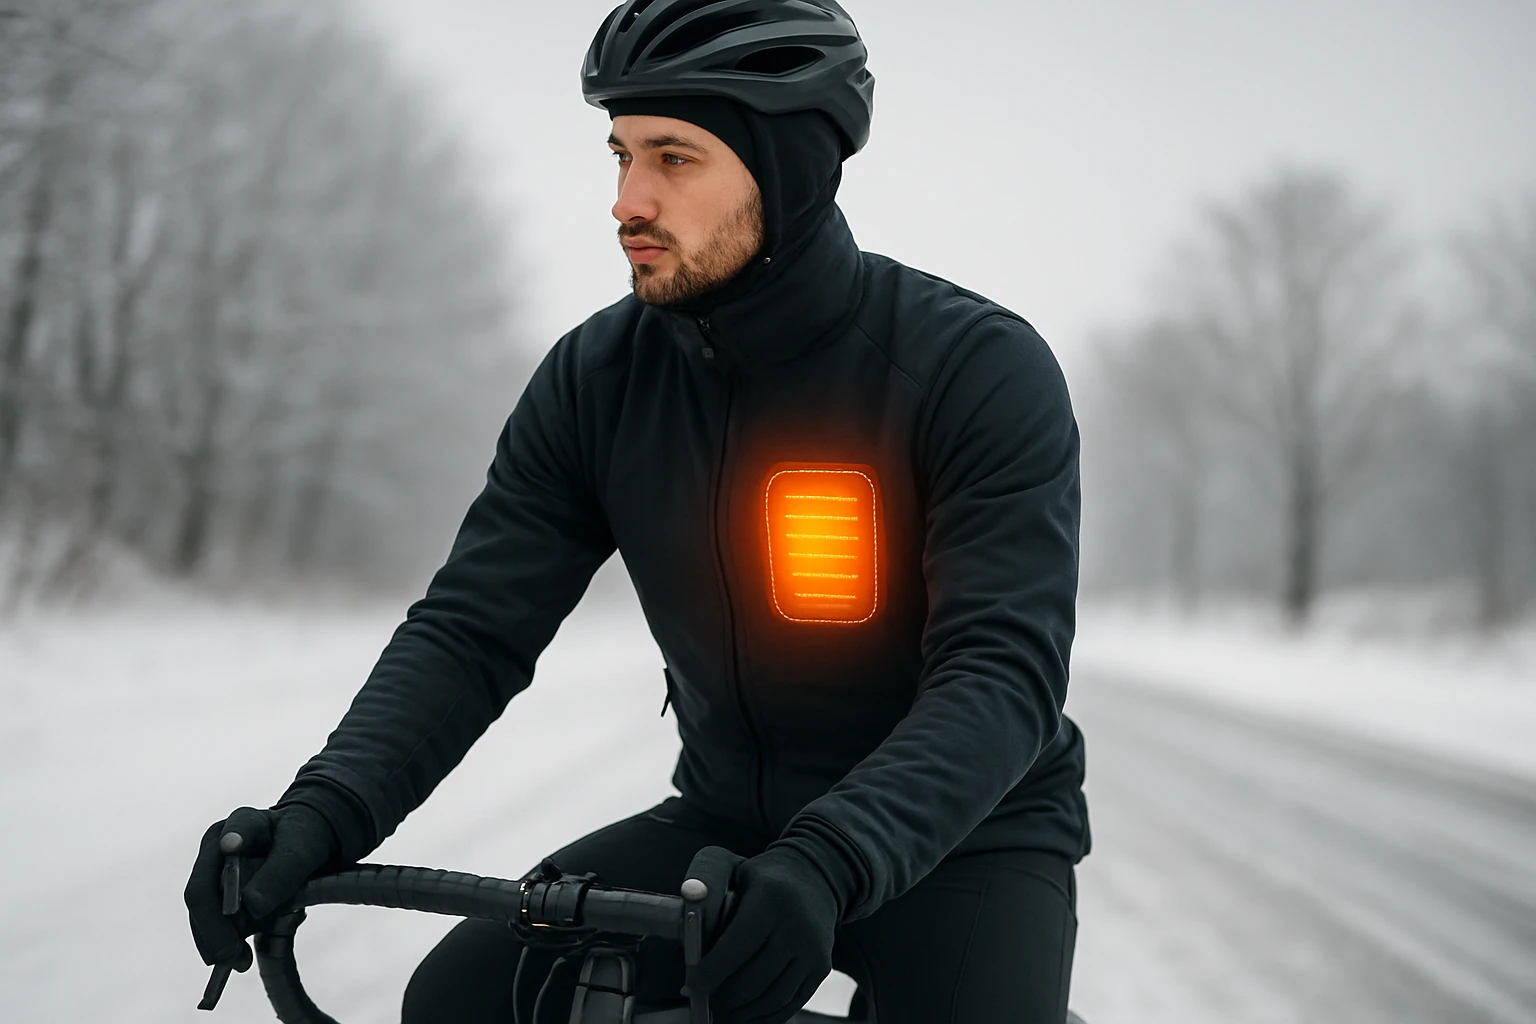
The core of any winter cycling wardrobe is a base layer that provides both insulation and active heating. The GCRFL Winter Cycling Jersey Set offers a practical combination of brushed‑fleece fabric and integrated pockets for small electronics. Although the set does not contain built‑in heating elements, its high‑loft polyester fleece retains body heat efficiently, making it an ideal platform for adding a separate battery‑powered heating pad.
This jersey set includes a long‑sleeve jersey with three rear pockets and a zippered pocket sized for a 6.1" phone, allowing the rider to store a compact battery pack safely. The bib pants feature a silicone gripper that prevents the garment from riding up, ensuring consistent coverage of the thighs and hips. At a price of $65.98 and a rating of 4.5 / 5 from 320 reviews, the set delivers strong value for cyclists seeking reliable warmth without excessive cost.
When selecting a heated base layer, prioritize fabrics that wick moisture away from the skin while providing loft for trapped air. Polyester fleece, as used in the GCRFL set, meets both criteria and does not absorb water like cotton, which would otherwise chill the rider. Pair the jersey with a thin, rechargeable heating pad placed in the zippered pocket; the pad can be connected to a small lithium‑ion battery that fits comfortably in the same pocket.
3. Build a Layering System Around the Heated Base
After securing the heated base layer, add an insulating mid‑layer such as a lightweight down jacket or a merino‑wool sweater. The mid‑layer should be breathable to allow excess sweat to escape, preventing the rider from becoming damp and cold. Over the mid‑layer, wear a wind‑proof and waterproof outer shell that protects against rain, snow, and gusts.
Each layer serves a distinct purpose: the base layer manages moisture and provides active heating, the mid‑layer adds static insulation, and the outer shell shields against external elements. By arranging the layers in this order, the rider maximizes heat retention while maintaining the ability to vent when the temperature rises. Adjust the number of layers based on the earlier weather assessment; on milder days, the outer shell alone may suffice.
4. Install and Position the Battery Pack
Choose a battery pack that delivers at least 500 mAh of capacity and includes a temperature‑controlled output. Place the pack in the jersey’s zippered pocket, ensuring that the cables are routed away from moving parts such as the zipper and the bike’s frame. Secure the pack with the pocket’s elastic closure to prevent it from shifting during pedaling.
Connect the heating pad to the battery using the supplied connector, and verify that the pad is positioned against the torso where the core temperature is most critical. Many heating pads feature multiple zones (upper back, chest, lower abdomen); align these zones with the rider’s most vulnerable areas. Before departing, test the heating function for 30 seconds to confirm that the system powers on and the temperature rises to the desired level.
5. Adjust Fit and Conduct a Test Ride
Proper fit is essential for both comfort and heat retention. The silicone gripper on the bib pants of the GCRFL set prevents upward movement, but the rider should still ensure that the waistband sits snugly against the hips without restricting breathing. Adjust the jersey’s cuffs and hem to create a seal that blocks wind while allowing full range of motion.
Perform a short test ride of 5‑10 minutes in a safe area to evaluate the heating system’s performance. Observe whether the battery maintains heat for the expected duration and whether any moisture accumulates inside the pockets. If the battery drains too quickly, consider reducing the heating level or using a higher‑capacity pack. Adjust the layering if the rider feels excessively warm, as over‑insulation can lead to sweating and subsequent chill.
6. Maintain and Care for Heated Clothing
After each ride, disconnect the battery and allow both the heating pad and the garment to air dry completely. Moisture trapped in the fleece can reduce its insulating properties and may cause the battery to short if re‑charged while damp. Follow the manufacturer’s washing instructions for the jersey set: machine wash on a gentle cycle with cold water and tumble dry on low heat, or hand‑wash to extend the fabric’s lifespan.
Store the battery pack in a cool, dry place and recharge it according to the supplier’s guidelines. Over‑charging can degrade battery performance, while under‑charging reduces heating efficiency. Regularly inspect the zippered pocket for wear, as this area bears the most stress from the battery’s weight.
Tips & Pro Tips
- Layer moisture‑wicking socks and insulated shoe covers to keep feet warm without sacrificing pedal feel.
- Use a helmet liner made of thin fleece to protect the head, which loses heat rapidly.
- Carry a spare battery pack on rides longer than two hours; a backup ensures continuous heating if the primary pack fails.
- When riding in sub‑zero temperatures, pre‑heat the battery pack in a pocket for a few minutes before starting; a warm battery delivers heat more efficiently.
- Consider using a reflective vest underneath the outer shell for added visibility during low‑light winter conditions.
Conclusion
Choosing and using heated clothing for winter cycling involves understanding weather impacts, selecting a functional base layer, and integrating a reliable heating system. By following the step‑by‑step process outlined in this guide, the rider can enjoy longer rides, maintain optimal body temperature, and reduce the risk of cold‑related injuries. The GCRFL Winter Cycling Jersey Set provides an affordable, well‑reviewed foundation that works seamlessly with external heating pads and battery packs.
With proper layering, battery management, and post‑ride maintenance, heated apparel becomes a dependable tool for any cyclist who refuses to let winter limit performance. One should experiment with different configurations, track battery life, and adjust layers based on personal comfort. In doing so, the cyclist transforms cold rides into enjoyable experiences while staying safe and warm.
Products Mentioned in This Guide
Frequently Asked Questions
How do I choose the right heated cycling jersey for winter rides?
Select a jersey with adjustable heat zones, a reliable battery, and a fabric that wicks moisture while providing insulation.
Can heated clothing be integrated into a traditional layering system?
Yes, wear the heated base layer next to your skin, add a breathable mid‑layer, and finish with a wind‑proof outer shell.
What is the typical battery life of heated cycling apparel and how can I extend it?
Most batteries last 2‑4 hours on low settings; conserve power by using the lowest comfortable heat level and turning off zones you don’t need.
Is it safe to ride with heated clothing in wet or rainy conditions?
Modern heated gear is water‑resistant, but keep the battery in a waterproof pouch and avoid submerging the electronics.
How should I clean and maintain heated cycling garments?
Detach the battery, wash the garment on a gentle cycle with mild detergent, and air‑dry; never machine‑dry or iron the heated elements.